Reproduction of Gustav Klimt's, "The Kiss" (in progress)
Doors of Perception
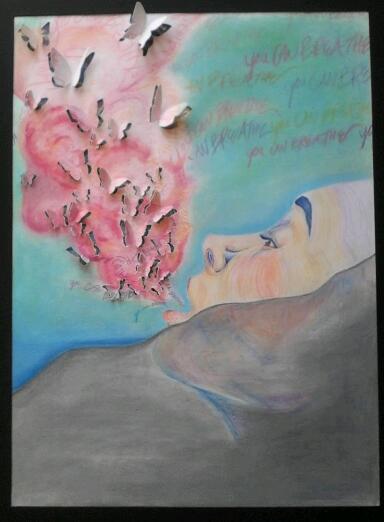
You Can Breathe pt 1
You Can Breathe pt 2
Photoshop "Sound Illustrations"
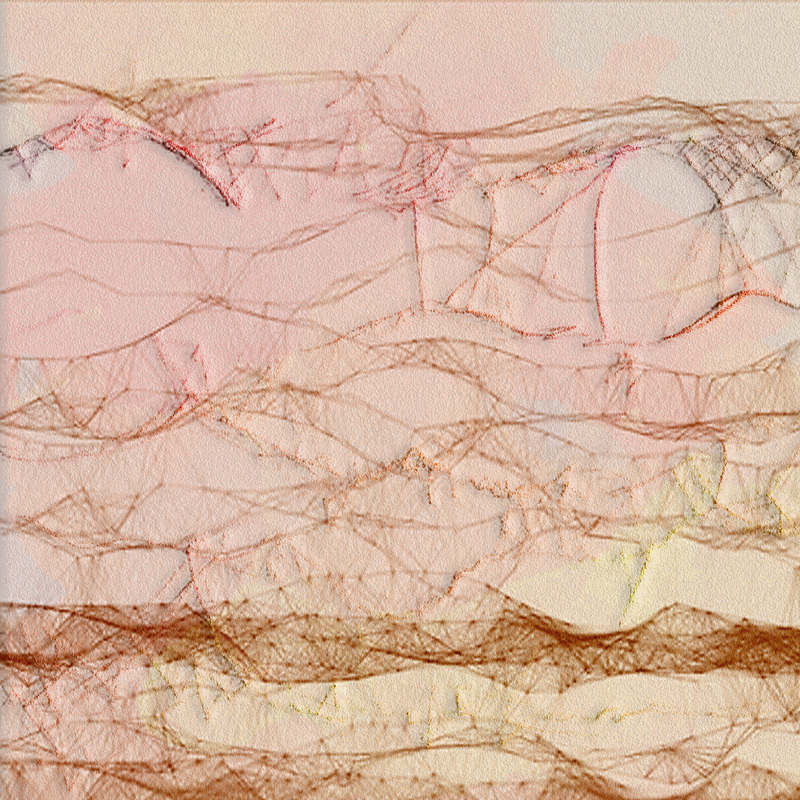

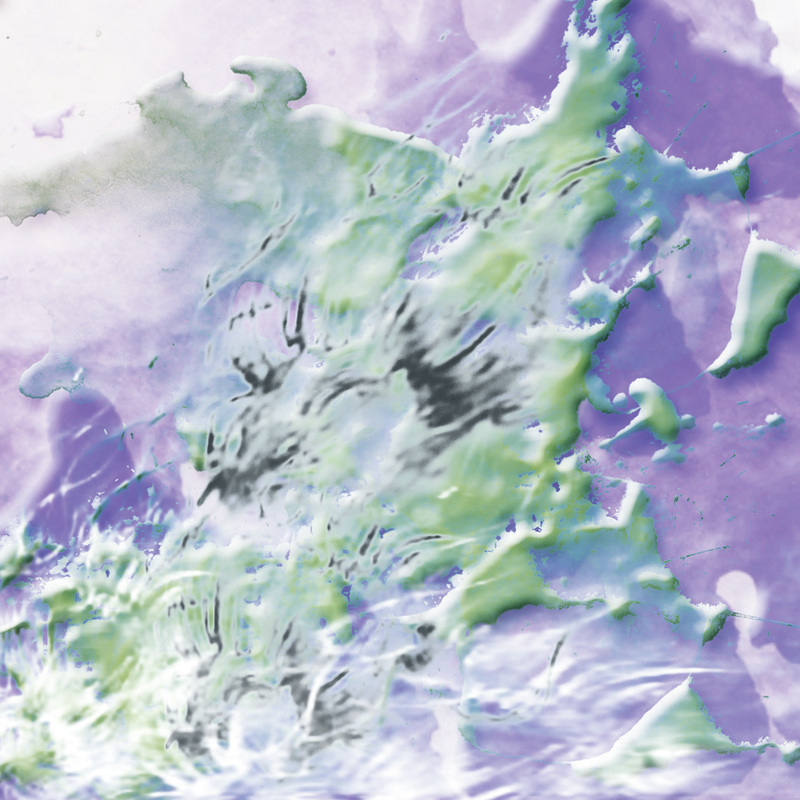
Polarities of Nature and Culture
2nd place in Annual Juried Ars Nova Exhibition
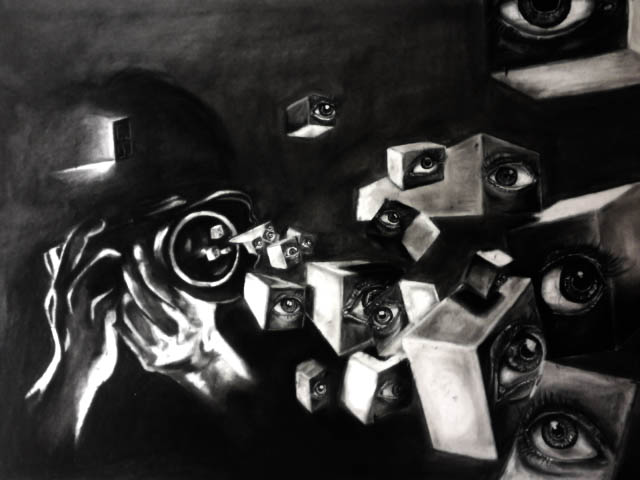
No Mans Land
She is not for a man to conquer, nor is the land for a man to conquer.
Project: Final
Objective: Open ended
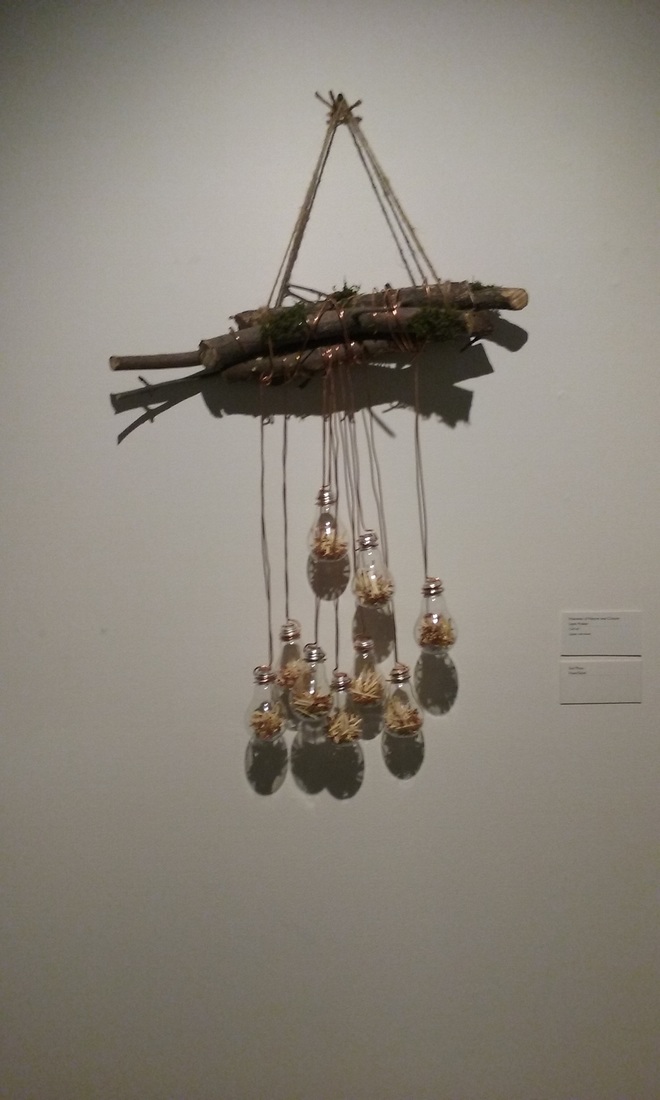
"The Rabbit's Hole"
There were many ways I wanted to go with this project. I knew I wanted to make something organic since my last couple of projects have been more mechanical. I was trying to think of ways to make water with a sculpture because it is such as elusive, yet powerful form. After some research I decided I could make “water” using these little tubes of glass. I was completely inspired and a slew of ideas came to my mind.
I finally came up with an idea I thought would work. However, through the course of making it, I ran into a lot of speed bumps along the way and had to re-route several times. From starting on one idea, to completely start over on a new idea, I had to make a decision that would allow me to have a finished piece that I could still be satisfied with. It was fun to play around with my creativity, even if most of the ideas I had were unrealistic to accomplish. After many different attempts, I finally decided to make, “The Rabbit Hole”.
I am disappointed that this sculpture does not strongly communicate an idea, because it is so representational. I am happy with the way it looks, but I wish I didn’t do such a representational piece. I think it comes across as more of a stage-craft piece than an art piece. This was more of a learning experience and an exploration of materials for me. I had fun with it too, and have a better sense of how to treat the materials in a efficient way next time I make a sculpture like this. I’ve got some extra material too, so maybe I will do just that.
If I could give meaning to this piece, I would want it to communicate that suffering is a part of life, and that accepting it, can help release that pain. We all have found ourselves at one point or another “down the rabbit’s hole”, an expression meaning to enter a period of chaos or confusion, a bizarre or difficult state. In my sculpture, the black rock symbolizes the weight, ickiness, and despair that comes with suffering. I want people to imagine this rock being inside them, whether the pain is found in their mind, heart, gut, wherever their suffering resonated inside them. At first, the problem you are facing may leave you feeling helpless, that this situation is an unbreakable force. But with time, there is softness and the walls begin to crack. The opening shows light and shards of glass, juxtaposing the dark heaviness outside. This is to show how we end up learning from our pain, and can actually find beauty again, even within that suffering. The water flows from the crack to symbolize new hope, and a life giving energy flowing back again. There is moss and Baby’s Breath flowers growing on the black rock, showing rebirth and resilience, that even the most delicate things have great strength. What was once so hard and tough, is now not what it seemed. Masked underneath all heaviness and gloom is the opportunity to grow and restart. Much like what the poet Rumi said, “The cure for pain is in the pain.” It is through the rabbit’s hole that we might just wake up in a renewed and fantastic world.
Project: Put a Bird On It
Objective: Put a bird on it.
Objective: Put a bird on it.
To me, “put a bird on it” is a sarcastic way to improve something. If there is something basic, just put a bird on it, and all of a sudden you’ve got something of value. I never gave it much attention, but after watching this Portlandia clip, I realized how common it is for people on websites like Etsy, to try and sell things such as totes bags with nothing but a simple emblem. What is more, they sell it for an outrageous price! It’s funny how “tasteful trends” are given such value in peoples eyes, no one would pay $40 for that pair of sock, put a bird on it and maybe someone will. It makes you wonder how many hipsters threw out their bird tote bags and remorsed their “freedom” bird tattoo.
The same rule goes to the fine arts world, beyond just crafts. A lot of people make their work with no heart or soul, but simply know what will attract a lot of attention. And that’s fine. But what’s it worth? Maybe at it’s hype a lot, but perhaps the piece of art that was made with sincerity is what will be timeless. And that is priceless.
For the base of this project I chose something that I had once made in a hurry, with no care, or passion. Before I left for traveling this summer, I got an order for a longboard someone wanted. This was about a week before I was going to leave. I was so excited to get an order, but realized I had very little time to finish it. But I was determined. Between packing and running around trying to get everything in order before I left for my summer-long travels, I somehow managed to finish the deck. ….However... It was terrible. The craft I mean. I rushed so much that I cut the board before I put it in the press, so sloppily glued the layers together that when I removed it from the press a part of the deck shredded off, roughly sanded it, and overall it was a mess. I put on my special coffee griptape and stained the deck dark brown, hoping it would hide some flaws. I was so disappointed with it. I so mindlessly put it together that did steps in the wrong order and didn’t put care into the deck to make it well-crafted. I just wanted to make it so I could sell it.
Well it turns out I decided not to sell it. I left for my travels and left it at home. When I returned, I still disliked looking at it. Finally, this project came around and I knew the deck had some hope. I put a bird on it. And presto. Just like that everything that was wrong about the board became right. I made sure I chose the most generic, winter card chickadees to put on the deck. I might even sell it now.
Project: Thinking Outside of the Toolbox
Objective: Construct a "toolbox" for the "tool" of your choice.
Objective: Construct a "toolbox" for the "tool" of your choice.
The making and use of tools is what separates humans from most of the animal kingdom. However, perhaps the oldest, and most studied technology is the mind. The mind is the most crucial tool we use all day. And it is with this tool that we are even able to create other tools. I am constantly writing out thoughts and ideas in random journals, sketchbooks, class notes, or any paper laying around. Although it’s great to have random thoughts jump out at me from time to time, it isn’t so great having them all over the place. I want to work on focusing on one idea until I see it through. That’s why I decided to make a toolbox for all my thoughts and ideas. For my tool box, I kept the design simple. a tall, but thick cylinder with a mechanical iris on top. My idea with having the iris as the lid was so I would remember to focus on whatever ideas I put in the box. The iris is an analogous device in a camera. It’s role is to stop the passage of light, except for the light passing through the aperture, allowing the camera to focus.
The construction for the case was fairly simple. I used a three inch drill press to cut out the center of my cylinder. I made these cuts on eleven, three-quarter inch boards. After all the centers were drilled, I took them to the band saw and cut out the outer circles for each. Needless to say by the end I was pro at cutting out circles. After sanding them all and cutting out one more circle without a hole drilled (for the bottom), I glued them all together.
The mechanical iris part was a little more tricky. I actually found instructions for making it by accident as I was searching on a website called instructables for a way to fix a friends watch. After coming across it, I realized it was perfect for what I wanted to do. I love copper, for its elemental properties, and also is color and workability, so I chose it to be my shutters for the iris. I also already made a piece using copper, so I figured it would tie in nicely with it. Using a thin copper sheet, I cut out all the leaves with metal scissors. Setting that aside, I cut out, ONCE AGAIN, another circle with a drill hole. Instead of attaching this one to the cylinder, I cut twelve grooves into the circle using a table saw. I made sure the saw wouldn’t go all the way through the wood so the grooves would act a tracks for the copper leaves I made. Okay, so I cut out ONE MORE CIRCLE (and this is the last), but this one’s thickness was less than a centimeter. I drilled holes into it according to the tracks I made. After going to about, what feels like 5 different hardware stores, I finally found the pins I was looking for. I needed to attach them to the copper leaves so they’d run through the grooves. To my horror, I learned that you can not sauder steel to copper, which is what the pins were made out of. Luckily I found welding glue that worked just fine.
I put everything together, and to my delight and mostly surprise, it worked! I was unsatisfied with the look of just this neutral cylinder I made however. But it had beautiful grain marks all along it from the different pieces of wood I used. I learned about a way of finishing wood by burning it, and I also knew if I did it light enough it would actually enhance the line of the grain. I wanted to do a blue copper patina on the leaves, but each method I tried didn’t turn out the way I wanted it to. After this project I realized I want to start making different scale pieces. They all seem to be the same, standard size.
The fun part for me was collecting all the notebooks I had that I knew I made notes in. I opened each one and read old thing I’d written. I copied some ideas I once wrote onto little slips of paper and put them in my box. Now when I go to pull one out, I’ll remember to stay with it a while, and give it some focus.
Project: Techno-Bling
Objective: Investigate form and space by creating an artistic interpretation of a 3D object of ornamentation using Tinkercad and Sculptris.
Objective: Investigate form and space by creating an artistic interpretation of a 3D object of ornamentation using Tinkercad and Sculptris.
Once again, I was excited to start on this project. I have designed jewelry and clothing before, so I figured this was right up my alley. I wanted to make the pieces to be more like art you can wear, rather than just jewelry. So I made a few sketches. I started on Illustrator and made one piece,the meditation piece, because that was a program that I was teaching myself and wanted more practice with. But I realized that this was a chance to broaden my horizons even more. So started working with the other programs, but soon realised that my designs were too complicated to finish with the skill level I had with these programs. I decided to take a step backward. Actually, I decided to step all the way back and start by watching beginners tutorials. I found that Sculptris worked the best for me, (TinkerCad wouldn’t load at all actually…) and started to build on there and explore what would be possible for me to do. It’s amazing all the things you can do. Some designs I made were planned, others I just went off on a whim and had fun with. I learned how to make more complex and precise forms using the grab tool and adjusting its strength. This allowed me to really get the sphere to branch into whatever I wanted. After watching some more tutorials, I learned that you can actually imprint an image onto your shape. …… yessss. By adding more triangles to the surface you want to imprint, you simply download the image to the brush tool and select it, then enabling it, use the draw tool and click it at the place you want the image to be imprinted. I used this method on the “Aztec Sunstone” necklace, the “Fibi” earring and amulet, and also on the bottom of the “Babylon Cosmos” ring. This is where the smooth tool came in handy because I could clear out any unwanted material that came up when I imprinted the designs. Another useful tool that I used was the inflate tool, but on inverse. This actually helped me create the indents and grooves in the “Fibi” rings. The “Lift em UP” crown was a result of experimentation. I learned that you could make a mask and select only a section of the sphere to modify. I isolated a section on the sphere and started to pull and drag and create a free form. I started playing with other tools, inverting them and adjusting their strengths until I came upon something interesting. In the middle of this lacey form, it looked as if there was a little dude in the middle soaring up. I liked that and decided to stop fussing around and focus on making this into a piece that’ll work. That’s how the crown, or ring, came about. Towards the end I also experimented with painting the pieces as well. I will definitely continue to explore and create with this program.
Project: Public Art Proposition
Objective: Artists are to create inviting and public works that evoke great social interaction and display the vision and mission statement of Northern Illinois University.
Objective: Artists are to create inviting and public works that evoke great social interaction and display the vision and mission statement of Northern Illinois University.
The overall message this sculpture is to capture the journey one takes on their path to fulfilling their destiny.
A triangle shape gives a sturdy base. It also represents knowledge and balance.
The triangle shape starts to take on a new form, spiraling up into a staircase. It is to look as if it’s creating a sculpture out of itself. We can compare ourselves to this process. We can look at ourselves as once fresh out of the mold, with each decision and direction we take shaping ourselves and forming our identities.
The stairs represent the steps we take on our journey. Each step is a different size because not every step we take in life is equal. Some changes may be more difficult and enduring than others that may come with more ease. The staircase spirals up into the unknown because the future is indefinite. We can only walk in a direction and hope we get to our envisioned destination.
The light gives the sculpture life. It can also symbolize the soul. It illuminates the whole of sculpture to remind people to be aware of your soul’s desire and to use it as a guide in every step we take in realizing our dreams.
The galaxy in the back is to remind us when we get so caught up in ourselves on the journey, in our problems and struggles, that there is so much more out there and so much more at work. It reflects the enormity of life, the vastness and limitless possibilities life has to offer.
The making of it was fairly simple. When I saw the material, I knew I wanted to do some sort of geometric design. Then I thought how cool it would be to do a “pop-up” style piece. I thought more about what would make a good sculpture for NIU and what could speak for the entirety or the campus’ population. I figured a universal message that all humans can relate to, that also inspires would make for a good public work. I hope it reminds fellow students walking by to follow their dreams.
Project: Design from a Line
Objective: Make the skeletal framework of a 3D object.
Objective: Make the skeletal framework of a 3D object.
This line assignment was especially fun. I love looking at the basic structures of things, all the little parts that make the whole. I think it’s important to know what it is that actually makes up the whole. Like what Leonardo Da Vinci advised, “Know the structure of all you wish to depict”. For this project I really wanted to use wood to make the skeletal shape of my object, the lantern. Something was just telling me to use wood. Perhaps the irony of making a lantern out of something as flammable as wood, but also I could just see a wooden frame looking better in my mind. It reminded me of what many surfboards, airplanes, and boats look like before they’re complete; just a wooden frame. I wanted the piece to look like it could be finished, but still completed in it’s “process of completion”. Cutting out the little pieces was difficult, and sanding them tedious, but it is still something I enjoy. Once I had all my little pieces, I layed them out and hoped they would come together like I planned. Luckily I had little problem piecing it all together. I used copper wire for the handles on the lantern and put on a copper leaf trim on some edges to tie it together. Something can be said about the conductivity of the copper pairing with the flammability of wood I think. I can imagine this type of lantern being good luck for a camper or explorer where having light or fire for warmth is vital. When it comes to survival being able to make a fire can be the most tricky, but also the most important aspect. This lantern could represent what it takes to set yourself up for success. If the match were to strike, you would hope the environment around it would be ready and able to handle that transfer of energy, not one made of something like teflon. The same goes for yourself, when there is a spark in your own life, you would hope that you are ready and prepared to take advantage of that moment.
Project: Object Interaction
Objective: Choose an object that implies meaning and create a piece out of plaster to interact with the object.
Objective: Choose an object that implies meaning and create a piece out of plaster to interact with the object.
When first starting this project, I had no conceptual idea in mind. I looked at what the objective was and got to work. Scrounging around my house for interesting objects was my first step. I looked for objects that inspired me, that had some kind of special meaning to me, or that were just visually interesting. After coming upon a few strange things and coming up with various amounts of sketches, I decided I would develop my ideas using this jewelry organizer that was in the form of a small tiered garden water fountain. I thought it was an interesting form that was obscure enough so it could communicate a lot; the layers of the fountain could represent deeper meanings, the color, it’s vintage feel, all these things made it speak a lot. When thinking about what form I could make out of plaster to interact with this piece, I knew I wanted to do something that represented water. Water is very emotional, but it is strong. It is healing, but can also be catastrophic. I could make a very active and fluid form, which is something I thought would be important because plaster can look very heavy and dense. Plus water with a fountain just made sense. I made a couple sketches, some too complicated, others too simple until I finally decided on one that was basic enough to complete with the amount of time I had, but also carried a strong enough meaning. Out of plaster I wanted to make a wave that would be overcoming the fountain. I had some basic idea of what I wanted the message to be, but as I worked on it, more and more meanings came out. But the one that stuck the most came from the notion of, “Why would a wave be overtaking a fountain? Isn't it the fountain that controls the water?” With this piece I wanted to represent the self, where the fountain is the body, and the water is ones own inner life force. When everything is in order and we are doing what we are supposed to, what we were designed to do, there is peace. We are at peace and therefore we emit peace. Just like the qualities of a fountain in garden; it brings tranquility to the area. But when the fountain springs a leak and does not function as it should, the water may be spilling everywhere, creating a sort of panic in the garden. As with us, when something isn't going right there is a panic. It’s as if we've betrayed ourselves, where we once before were able to have peace with ourselves, we are now becoming overwhelmed by ourselves. Our greatest strengths can also be our greatest weaknesses. We have the power to literally save or destroy ourselves. Life is a lot about learning to balance and manage that power. So with this sculpture I wanted to communicate that the water is that power. Is your wave one that creates or destroys?
